WebDAV (Web Distributed Authoring and Versioning) is a protocol that extends HTTP, allowing users to manage and edit files on a remote server. Konica Minolta devices support WebDAV scanning, providing a convenient method to scan documents directly to a remote server or cloud storage. This guide will walk you through setting up WebDAV scanning on Konica devices, ensuring a smooth and efficient document management process.
Specific setting method:
1. Confirm that the system has installed IIS (Internet Information Services)

2. Open C:\Inetpub\wwwroot

3. Create a WebDAV storage folder

4. Run and enter "inetmgr", open IIS Manager and add a virtual directory

5. Enter the alias and select the physical path slice

6. Right-click the virtual directory and select "Edit Permissions"

7. Click "Sharing" - "Advanced Sharing"

8. Set sharing permissions

9. Click "Security" - "Edit"

10. Under the WebDAV virtual directory, double-click "Authentication" on the right

11. Set "Basic Authentication" to "Enabled"

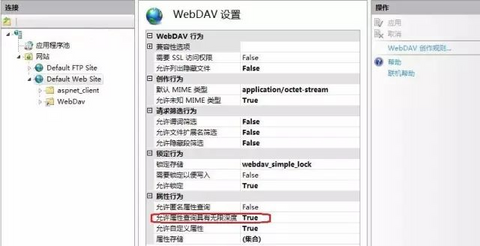
12. Select the default site, Click "Enable WebDAV"
13. Click "WebDAV Settings"

14. Set "Allow property queries with unlimited depth" in "Property Behavior" to True

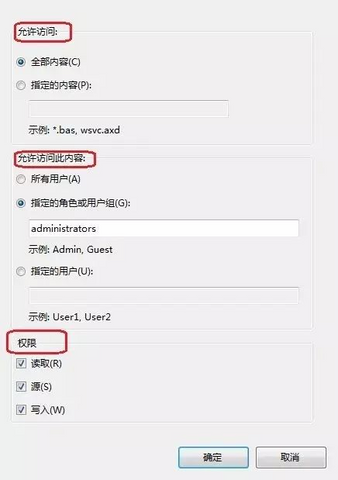
15. Under the WebDAV virtual directory, double-click "WebDAV Creation Rules" on the right

16. Click "Add Creation Rules"

17. Set "Allow access", "Allow access to this content", and "Permissions" as needed

18. OK, open IE, enter "http://IP address/alias" to access

19. After confirming that it can be accessed, create a scan address to register the "WebDAV" destination

20. Enter the name, WebDAV address, directory name, user name/password, and confirm the port number

21. Test scanning in the MFP scan menu
Access again at "http://IP address/alias" to confirm that the file is published

Conclusion
WebDAV scanning with Konica Minolta devices offers a robust solution for managing scanned documents on a remote server or cloud storage. By setting up IIS and configuring WebDAV settings correctly, you can streamline your document handling process and improve efficiency. Ensure all permissions and authentication settings are properly configured to facilitate smooth operation and reliable access to your scanned documents.

